Tutorial Preview
Highlights
In this quick ten minute lesson, we have carefully selected all the key points to enable you to make this cake and you can always refer to particular lessons for more detail. The perfect place to come those of you who are strapped for time.
1. Carving the Cake
Struggling for time? Watch our highlights video which covers all the key parts of the tutorial in 10 minutes!
To kick things off, Molly advises using Madeira cake when making a carved cake as it is easier to work with and holds its shape better. Another advantage is that it also has a good shelf life once it’s covered. Molly uses buttercream in this tutorial but if you prefer, you can use ganache and you will get the same results. It’s definitely a good idea to have a few pictures in front of you showing different angles of pug dogs to refer to. When carving such a detailed and large cake, it’s always good to take breaks and come back to it every so often. Remember to use different knives and soften off the edges of your cuts as you go along and try and cut a little at a time. Don’t worry if you make any severe cuts however as it can be corrected by re-applying some cake with ganache or buttercream, or even with sugarpaste.
2. Making the Wrinkles
Now that you have your pug carved, it’s time to add those characteristic wrinkles. Molly uses a very clever technique that saves a lot of time and complicated sugarpaste work. By simply rolling out sausages of sugarpaste, placing them strategically, then covering with sugarpaste, we can create the pug’s wrinkles. By referring to your pug pictures, you can place the sausages of sugarpaste where all the key wrinkles are and also use these to create eye sockets and the general face area.
3. Covering the Cake
Molly advises that it’s a good idea to have the sugarpaste a little thicker when covering a carved cake so that it doesn’t tear when you are working with it. She uses about 2kg of ivory sugarpaste in this lesson. You may be left with extra but that’s better than too little. Once you have placed the sugarpaste over the cake, begin to work from the bottom of the board smoothing it down with your hands and then work it into all the folds over the sausages you placed on the cake earlier. When cutting away the excess sugarpaste around the bottom of the cake, make sure you leave yourself a little extra length so that you can tuck it in under the cake.
4. Adding the Back Legs and Tail
For the legs, simply roll out large loose tear shaped pieces of sugarpaste and secure these with a little edible glue. As your sugarpaste will be soft and warm by this point, you can shape it once it is on the cake. Once you have the shape you want, blend it in to the body with your fingers and then create more definitive creases and folds with your dresden tool. To really get rid of the joins, you can always dip with dresden tool in water but this is may not always be necessary.
5. Creating the Face
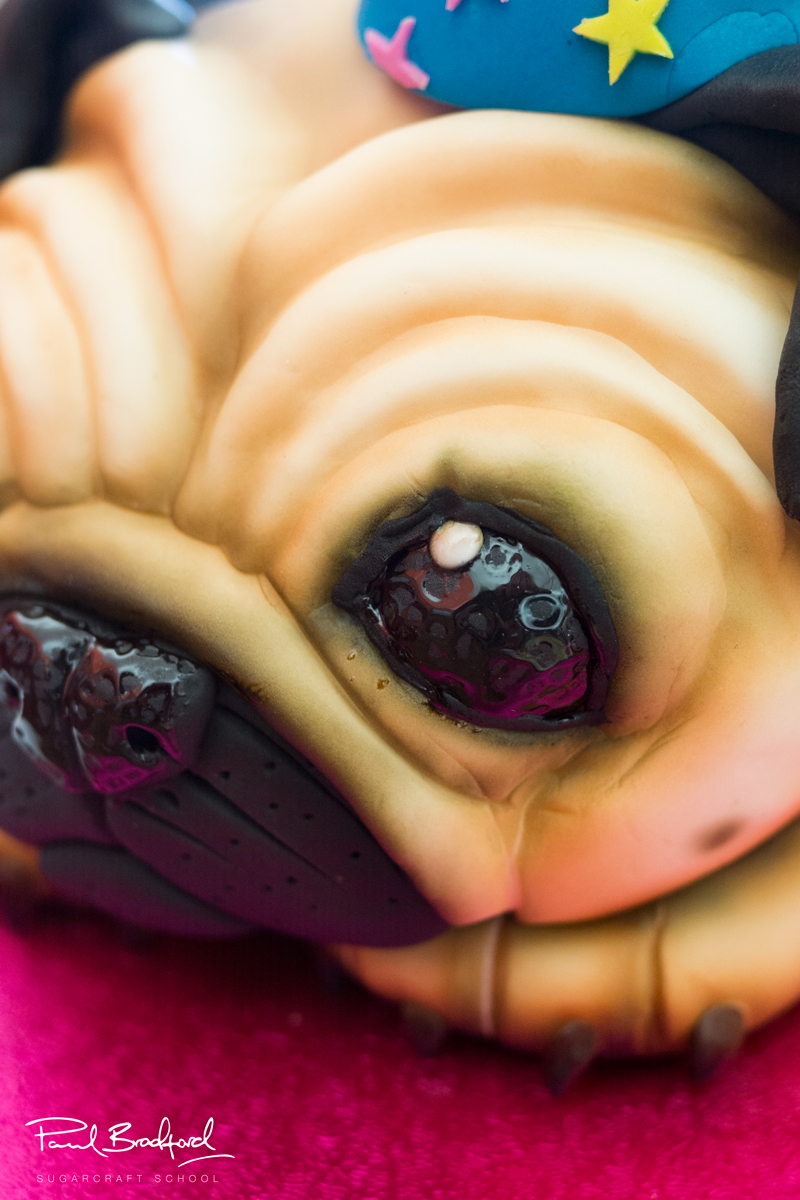
In this lesson, Molly focuses on the face and this time she adds sausages of sugarpaste to the outside of the cake and then merges them in with her hands and a dresden tool. It’s all about re-creating what you see to make the pug as realistic as possible, so carefully study a picture to get the details right. Make sure that your hands are clean when going back and forth with the black and white sugarpaste, but don’t worry too much if you get black marks on the white sugarpaste – you can pick these off or airbrush over them which Molly will be covering later in this tutorial.
6. Adding the Ears and Detail to the Eyes
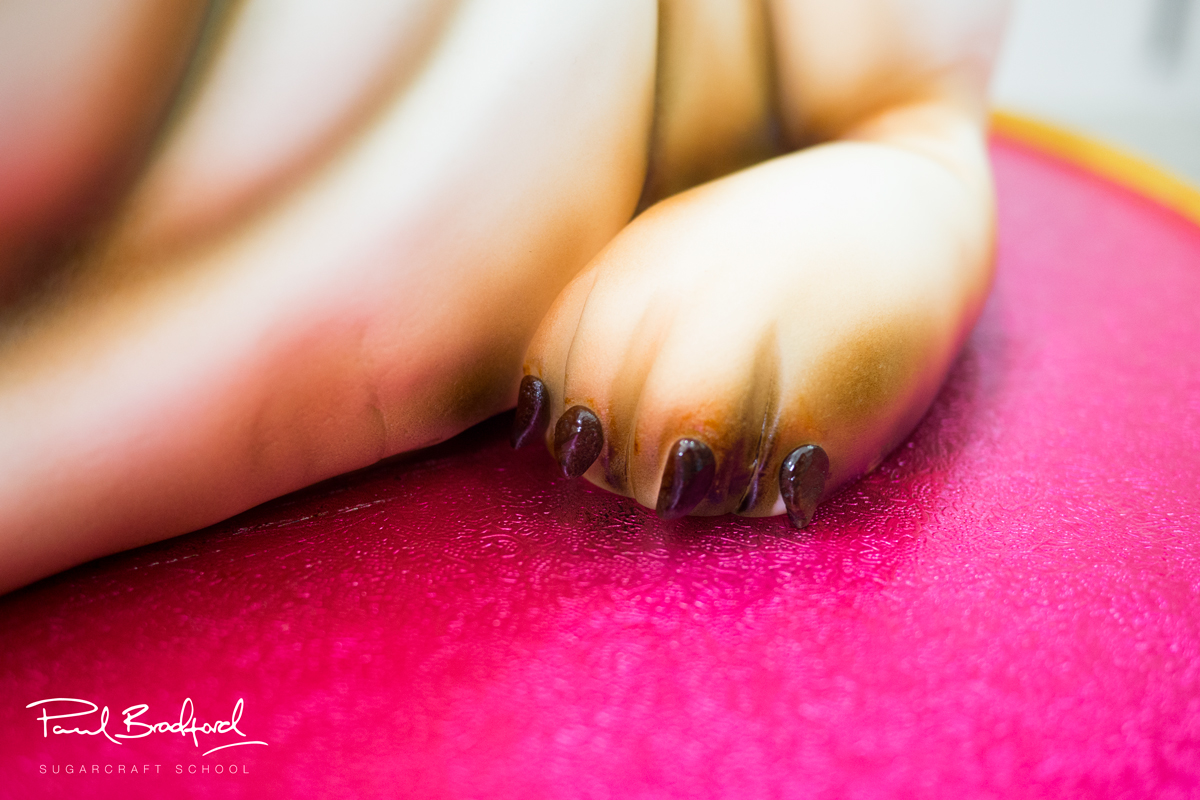
When creating the ears, make large triangular shapes from tennis ball size sugarpaste. These should get thinner towards one corner and it may be a good idea to make both of them at the same time, to ensure that they are as similar as possible. Pugs’ ears tend to fold over on themselves but if you want to have them sticking up or held in a certain position, you may want to add CMC or Tylo to the sugarpaste, or even use flower paste. For the claws, just make small carrot shapes from brown sugarpaste. Molly mixes brown with ivory sugarpaste and secures them with edible glue. Remember to add indents to the toes where you place the toenails to help them attach. Molly uses piping gel to add a wet look to the eyes and nose which works really and is easier to use than glaze spray when working on such a small area.
7. Airbrushing the Cake
In this lesson, Molly only uses two colours for the airbrushing – brown and black. She starts off by going around the cake with just brown and focusing on certain area more than others to emphasise the creases and folds and where shadows would lie. This creates a nice base colour. She then adds some black to the brown in her airbrush to create a dark brown and focuses on the parts of the pug where it would be really dark such as around the eyes and nose and under the body. Remember to always test the pressure and how much paint is coming out on a piece of tissue paper before going straight onto the cake and make sure it is clean.
8. Finishing Touches
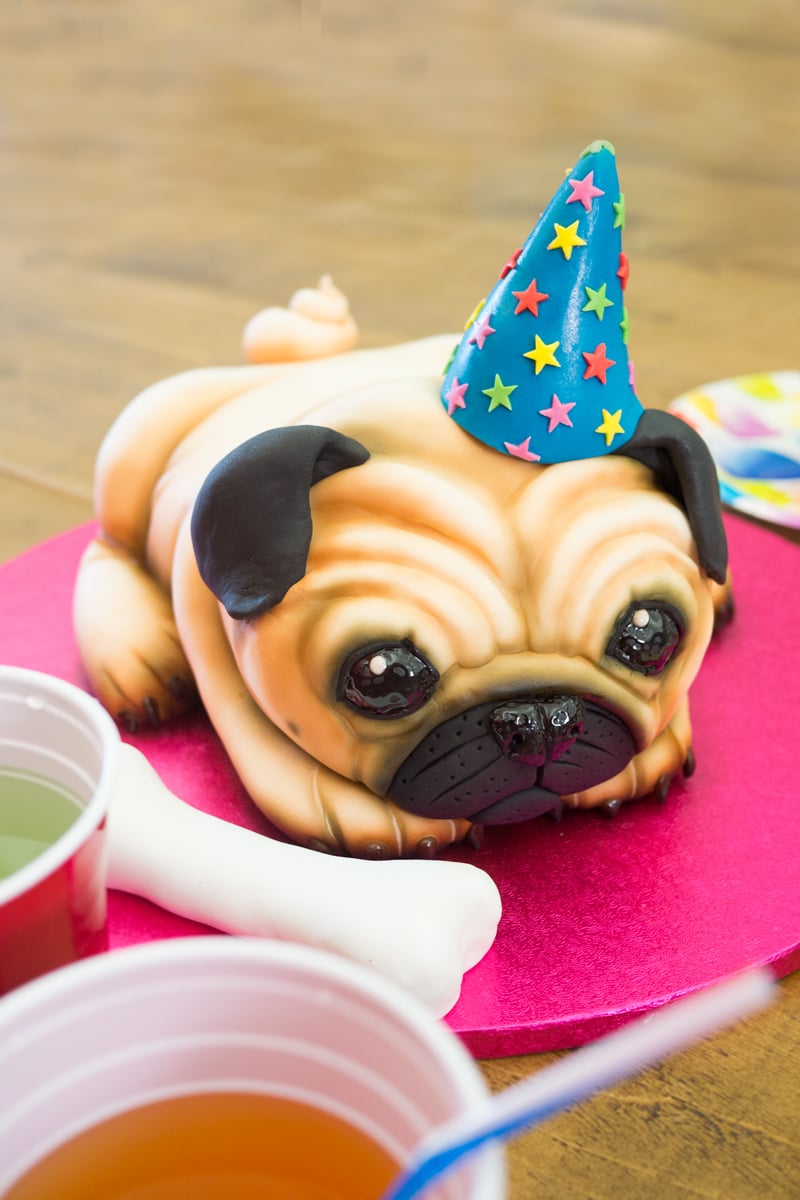
Isn’t the pug looking brilliant?! All that needs to be done now are the fun finishing touches, which include creating a party hat and a dog bone for the board. For the hat, Molly takes a large piece of blue sugarpaste, rolls a sausage and then by applying pressure to one side creates a tapered cone shape. She then secures it to the head with some edible glue. If you want to make the hat firmer you can add some tylo or CMC but this isn’t essential. And we’re all done!…It’s party time.
9. Other Ideas
In this lesson, Molly shares some other ideas that you can implement when making this cake to make it unique to you. We’re sure that you have some of your own ideas too and we would love to see them – please share pictures of your cake with us on our Facebook Page as well as Molly’s!
10. Pro Lesson
Molly gives some insider information detailing the cost to make this cake as well as what she would charge if commissioned to make it – vital information for any professional cake designer.
Molly Robbins from Molly’s Creative Cakes introduces us to her adorable Pug Dog Cake, perfect for almost any occasion and especially birthdays (for humans or dogs!). This cake covers a variety of techniques including carving, creating realistic detailing and airbrushing and is aimed at intermediate level cake decorators, taking approximately two half days to create.
We would love to see your take on the Pug Dog Cake – please share your photos with us on our Facebook Page as well as Molly’s!